


3D printing has become increasingly accessible, and tools like Creality Slicer play a major role in helping beginners turn digital models into physical objects. Whether you are using a Creality Ender series printer or another compatible device, slicing software is essential for preparing models with the right settings, supports, and layer structure.
This guide will walk you through everything you need to know about the creality slicer download, including what the software does, system requirements, installation steps, and how to get started with your first print. If you are completely new to 3D printing, this article will help you set up confidently without confusion or technical barriers.
What is Creality Slicer and Why It Matters
Creality Slicer is a specialized slicing software designed to convert 3D models (STL or OBJ files) into printable G-code instructions. It is built on Cura’s slicing engine but optimized for Creality printers, making it easier for users to get reliable results without advanced manual tuning.
The main advantage of using this tool is simplicity. Beginners can quickly load a model, select a profile for their printer, and generate print-ready files in minutes. This is why the creality slicer download is often recommended as the first step for new 3D printer owners.
In addition, Creality Slicer includes pre-configured profiles for popular printers like Ender 3, Ender 5, and CR series machines. These presets reduce trial-and-error and help users achieve stable prints even without prior experience.
Another important benefit is customization. While it is beginner-friendly, it still allows advanced users to adjust layer height, infill density, print speed, and temperature settings as they gain more experience.
System Requirements and Compatibility
Before performing a creality slicer download, it is important to ensure your system meets the basic requirements. Fortunately, the software is lightweight and runs on most modern computers without issues.
Creality Slicer is compatible with Windows and macOS operating systems. A standard PC with at least 4GB of RAM, a dual-core processor, and sufficient storage space is generally enough to run it smoothly. However, for larger models or faster slicing, a more powerful system is recommended.
The software supports a wide range of file formats, including STL, OBJ, and 3MF. It also works seamlessly with most Creality 3D printers, which makes it a convenient choice for users who want a plug-and-play experience.
One thing to note is that updates may vary depending on your printer model. Always check compatibility before installing a new version, especially if you are using older hardware.
Step-by-Step Free Creality Slicer Download Guide
To begin your creality slicer download, the first step is to visit the official Creality website or a trusted source. Always ensure you are downloading from a legitimate page to avoid corrupted or unsafe files.
Once you locate the download section, choose the version that matches your operating system—Windows or macOS. Click the download button and wait for the installer file to save to your computer. Depending on your internet speed, this may take a few minutes.
After the file is downloaded, open the installer and follow the on-screen instructions. The setup process is straightforward, typically requiring only a few clicks to complete installation. Once finished, you can launch Creality Slicer and begin configuring your printer profile.
It is also recommended to restart your computer after installation. This ensures that all system components are properly registered and the software runs without errors.
Installation and Setup Tips for Beginners
After completing the creality slicer download and installation, the next step is setting up your printer profile. This is a crucial stage because incorrect settings can lead to failed prints or poor quality results.
Start by selecting your printer model from the built-in list. If your exact model is not available, choose the closest match and adjust dimensions manually. You should also set your filament type, such as PLA, ABS, or PETG, depending on what you plan to use.
The software will then load default settings such as nozzle temperature, bed temperature, and print speed. While these defaults are usually reliable, beginners may need to experiment slightly to achieve the best results for their specific environment.
Another helpful tip is to save your customized profiles. This allows you to reuse successful settings in future projects without repeating the setup process every time.
Optimizing Your First Print with Creality Slicer
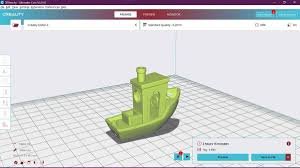
Once everything is set up, you are ready to prepare your first model. Import an STL file into the software and position it correctly on the build plate. Make sure the model is oriented in a way that minimizes overhangs and supports.
Next, adjust key settings such as layer height, infill percentage, and print speed. For beginners, a layer height of 0.2mm and infill of 10–20% is a good starting point. These settings provide a balance between print quality and speed.
After configuring the settings, click “Slice” to generate the G-code file. This file is what your 3D printer will read to produce the physical object. Save it to an SD card or transfer it directly to your printer, depending on your setup.
Finally, monitor your first print carefully. Early observation helps you identify issues such as bed adhesion problems or stringing, allowing you to make adjustments for future prints.
Conclusion
The creality slicer download process is simple, but it plays a crucial role in ensuring successful 3D printing results. From installation to configuration, each step helps you build a strong foundation for producing high-quality prints.
For beginners, Creality Slicer offers a perfect balance between ease of use and customization. With pre-configured printer profiles and beginner-friendly settings, it removes much of the complexity often associated with 3D printing software.
As you gain experience, you can explore more advanced features and fine-tune your settings for better precision and efficiency. With practice, Creality Slicer becomes a powerful tool that can significantly improve your 3D printing journey.